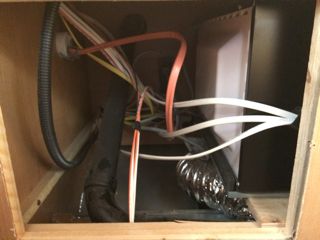
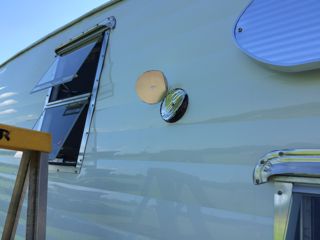
Upper vent carefully removed
'Turning Vane' which is an unassembled piece of ducting
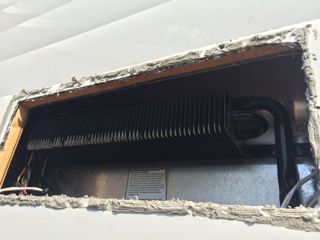
Turning Vane installed- fasteners along front edge
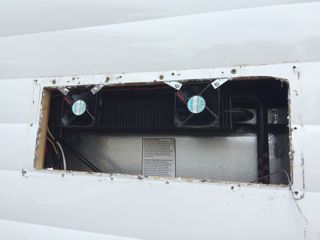
12V Fans installed to help exhaust hot air
Appliances & Equipment
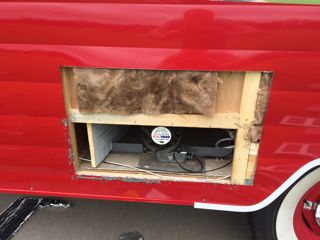
Refrigerator: The Dometic (RM2454) fridge is a 3-way power absorption type, using LP, DC or AC heaters to produce the heat that boils the ammonia required for the cooling process. To work correctly it needs to be as level as possible, and it should only be started on AC or LP; the DC setting is for maintaining temp. Per Dometic, there is supposed to be zero clearance at both sides and top of the fridge to the cabinet. Unfortunately, our outdoor speakers are mounted above the fridge where 1. They can’t be heard, 2. They cook from the fridge heat, 3. Fridge performance suffers due to lack of airflow pulling this heat out. (see radio below).
Some folks have slid the fridge out and insulated all around it (this requires disconnecting the gas line and looks like a bunch of work). Some have removed the countertop from inside to gain access to eliminate the speakers and fill with solid insulation (the top was too well attached on ours to easily remove it).
Whether you insulate or not, there are two things you should do:
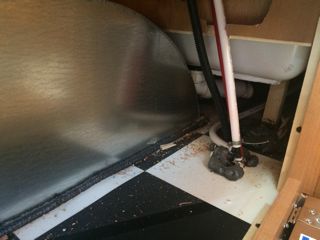
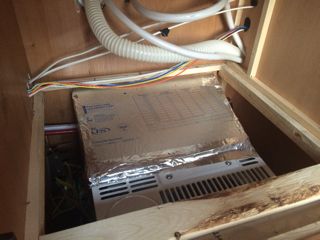
1. Install a ‘turning vane’. This is a piece of light gauge sheetmetal that closes the gap from the top of the upper fridge vent to the top of the fridge. I used a piece of AC ducting that was not yet crimped (curved but not crimped into a round) that I purchased at the local hardware store. I removed the upper vent, folded over the short edges of the tin so adjacent wiring wouldn’t rub, and slid the piece up and over the fridge. By folding over the leading edge at the vent I was able to secure it to the wood surround with a couple of small screws. The curve of the sheetmetal put the other edge in compression with the fridge top. No more hot air trapped over the fridge. This’ll keep your trailer cooler, the fridge colder and you’ll use less fuel/electricity, too. Consider relocating your external speakers before proceeding.
2. Add exhaust fans. This is a very popular mod and highly recommended. Pick up two small 12V computer style fans (I used 259-143 from parts-express.com) and mount them just behind the vent screen to pull out any hot air. The power can be picked off the unused 12V ‘Heater’ tab inside the fridge’s junction box so that the fans only turn on when the fridge is on.
|
Upper vent carefully removed |
'Turning Vane' which is an unassembled piece of ducting |
Turning Vane installed- fasteners along front edge |
|
12V Fans installed to help exhaust hot air |
Fridge DC Upgrade: At some point you might need to run your refrigerator off of DC power. Unfortunately, the circuit feeding the fridge is too small a gauge of wire for the lengths involved. This means wasted battery and poor fridge performance due to voltage drop. On a 16’ you can cut out close to 20’ of excess wiring by running a 12 ga wire pair from the fridge to the battery in the rear gaucho. All this involves is drilling a hole behind the fridge to drop the wire through. It can then be run in the space under the fridge behind the lower cupboard and back to the battery. Install an in-line fuseholder at the batt and swap the fuse from the fuse box to the new holder to power it (nothing else is on the original fridge circuit). Swap the wires at the screw terminals behind the fridge and you’re done.
 |
 |
 |
|
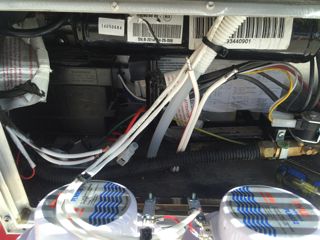
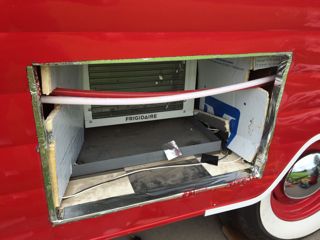
New 12ga pair with tinned leads shown coming up in center. Extended drain line also visible. Old pair on left now power a 12V convenience outlet (not installed here) accessed from outside via the lower fridge vent. |
Fridge drain line (white corrugated) with factory snap-in 'screen' prior to extending. I cut off the last couple inches with the screen and fit that over the end of my new PEX extension. | Floor penetration where the drain line was run to (line not shown). You'll need to remove the inner cabinet panel to get access. |
Fridge Drain Line: The factory fridge drain line is stuck through a slot in the lower vent door. A better solution is to drill a hole behind the fridge, unfurl the coiled up drain line and run it down through and over to the floor opening (inside/behind lower cabinet door for access) where water/power pops up for the shower. Be sure to reuse the little screen to keep mud daubers out. On our Shasta, there was almost no hose to work with, which I hear is unusual. I used some clear PEX that fit tightly inside the original hose to extend the line and reattached a short section of the original convoluted drain tubing with the screen onto the end to stick through the floor.
Semi-Related Fridge Tip: if your fridge won’t ignite on LP, try running the cooktop for a minute or two to purge the gas lines of any trapped air and try again.
Microwave Oven:
The word is that this is really an LG unit labeled as a High Pointe (EM925RYS-S). It’s a 900W unit and those running inverters when off of shore power say they haven’t had any trouble running it. I have yet to try myself. Things to watch: When installed, the weight of the unit is supposed to bear on the shelf under it; the metal surround on the front is to simply keep it from sliding around. Some have reported discovering the surround was bearing the weight of the microwave due to a sloppy install which causes the metal to fatigue and the unit to break loose. Easy enough to remove the screws and get the unit to sit properly. Some have added additional screws as well. Still others have found they are lacking the metal pan that sits under the unit. In such a case, contact the factory and have them send you a kit.
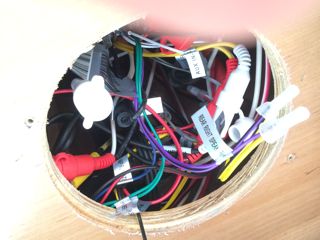
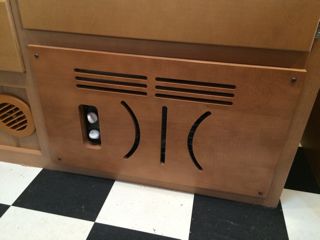
Tip: On a 16' the wiring to the converter and circuit breakers can be more easily accessed by sliding out the microwave. The grille on the left of the kitchen cabinet can be removed for further access.
|
Access via side grille. Note orange romex is shore power |
Radio & Speakers:
The Jensen radio (I understand two versions are running around) needs a little help. The antenna is nothing more than a pair of short copper wires crammed into the bulkhead behind the receiver despite the prototype reissue having an external mast. By removing the small access door in the RH overhead compartment, you can get to the Aux input connectors, radio power and the antenna connection. Mounting an external antenna through the wall in this area greatly improves reception. I went with this threaded chrome version from Amazon. The outdoor speakers are connected to the rear channels and thus to get them to play you need to shift volume to the rear via the Fade control. Note you should really pick up a pair of waterproof outdoor 8 ohm speakers and mount these behind the lower fridge vent door in place of the stock units over the fridge. This is especially important if you install insulation or the turning vane for the fridge which would block audio. This also puts the speakers at ear-height when sitting around outside. As it happens, the Jensen radio does support Bluetooth pairing, but doesn’t work with Apple products.
Wiring access in upper bulkhead for connecting an external antenna through the sidewall. Note additional aux input. |
Original speaker location- where the fridge heat cooks the cones and the sound suffers. |
Wiring to the original speakers captured, cut and extended to these new weatherproof speakers. Mounted on a hinge so they can be tilted out for access to the rear of the fridge. |
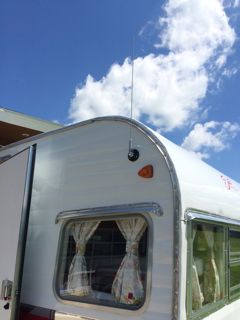
Exterior antenna - Hole drilled so mount and cable leads directly into area behind radio. |
Power Converter:
The WFCO WF-8735 converter triples as a battery charger, DC load distribution center and houses the AC circuit breakers. For the 16’ units, see the later Electrical section about the circuits, fuses and breakers as markings are either non-existent or incorrect. The converter itself will provide DC power to the trailer when connected to shore power, and has a 3-stage charging circuit to keep your house battery topped off. According to the specs, it will work with AGM type batteries. There is no onboard inverter, so the outlets and AC appliances (microwave and AC) will not work if boondocking. You may have noticed there is a built-in fan but the cabinet door is solid. This generally isn’t a problem as the fan doesn’t run unless the converter is working hard (such as trying to charge a discharged battery) in which case you can leave the door open a crack, or add a vent. More on this in the Electrical Section.
Air Conditioner:
Update 2023: After several camping seasons under our belt, I plan on upgrading to an 8k BTU Frigidaire unit. Even with all of the updates made below, and significantly better than "factory", there's a lot of room for improvement, especially if you plan on camping in hotter areas of the country.
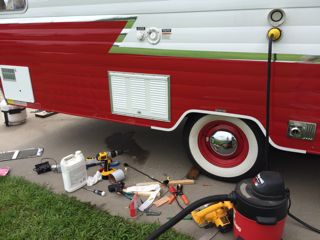
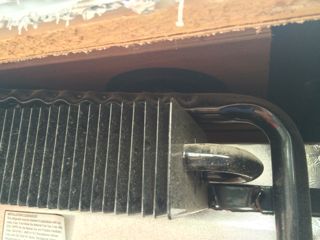
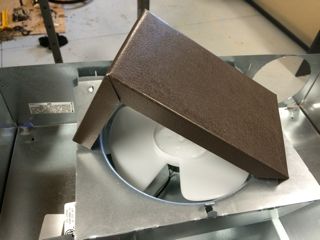
No way around it, you’re going to have to make some changes if you want the AC to work. The stock unit is a Frigidaire FRAO52XT7 6000 BTU and the implementation leaves much to be desired. If your Shasta has the original wood scroll type cover over the AC, you’ll want to remove this and make your own free-flowing version, or allow it to be removed during use as the slots are far too restrictive for correct operation. I ended up adding cabinet door catches on all four corners so it can be removed entirely for A/C operation, or snapped back into place when not needed. On the other side of the unit, there is no clear path to get hot air out and fresh air in. If you hear a fan running practically all the time even with air conditioner off, it’s a bandaid fix from the factory to try to force cool air in and is triggered by a thermal switch on early units, later combined with a wall switch halfway through the production run. Also take note, the metal pan under the A/C is designed to collect the condensate. You should have one or more holes drilled through this plate (and your floor) from the factory for water to run out of. One little problem…the water will just soak right into your floor as there’s no pipe, seal or flange. Easy enough to solve with a couple short lengths of PEX and some silicone.
Whether you upgrade to an 8000 BTU unit or not (some models do fit), you’ll need to make a plenum out of foam board to channel the heat of the unit all the way out to the vent opening, but leave access on the left and right of the opening for fresh air to be pulled in on the sides of the unit. (See the TSB Section)
A lot of this work can be done by removing the bottom of the kitchen cabinet over the AC. The fan does help once a plenum has been built, and adding a sheet of foam insulation over the works will help cut temps in that cabinet. In addition to these fixes, many of us have removed the AC exterior vent and enlarged the opening to use an oversized service vent door (VTS-781 from vintage trailer supply). Even dealers got in on the act of making plenums as a way to address complaints but few understood what they were doing so don’t assume your AC is working as well as it could be. I recommend Googling this topic as there are A LOT of different solutions under the sun.
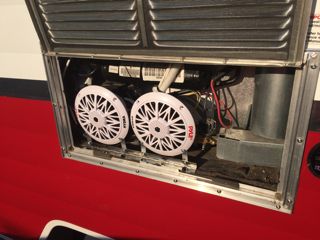
Note: The factory added a circulating fan in an attempt to move more air through the restrictive exterior opening (wishful thinking). This is controlled on later units with a wall mounted switch, but earlier Airflytes like ours, have no way of turning the fan off if temps are above something like 68 or 70F without actually unplugging it. After completing the A/C plenum work, I decided to reuse this fan on one of the sides to pull in fresh air, and added my own switch inside the trailer.
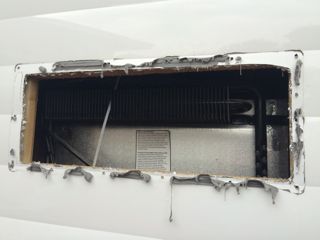
Looks nice...but gets a zero for functionality |
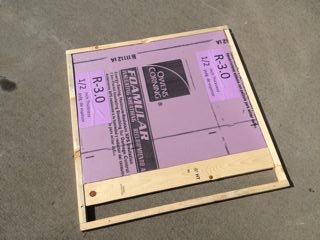
1/2" foamboard cut and installed in original 'cabinet floor' frame over A/C. |
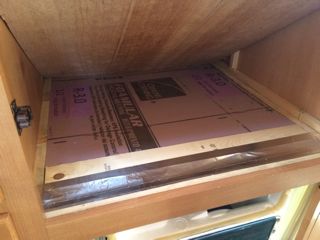
Installed over A/C after plenum work. Note foil tape along front edge. |

Lots of wishful thinking here with no defined intake/exhaust paths and a random fan placed in the center to keep it all moving. |
View from the inside. How can fresh air get pulled into the sides if there's no source? |
Using the new vent as a gauge, a sharpie marked the opening. Aviation snips and a power drill snip attachment made quick work of it. Next the circ saw to cut out the framing, being careful of wiring and plumbing. |
Metal edges and exposed wood sealed around perimeter with window sealing tape. Foam is NOT in final position. |
Before Proceeding:
1. For condensate drainage, insert short pieces of PEX tubing through the two drain pan holes with their top edges flush with the pan and the bottoms protruding just below the floor. Seal well with silicone to keep water out of the plywood floor. 2. Bring the left and right foam 'wings' in so they're 90 degrees with the trailer wall. Seal the edges of the top and side foam panels with aluminum tape so it all resembles the pic above. You can also add a small foam strip under the unit so all hot air is forced out of this 'box'. However, unlike the pic above, the exterior opening is now larger so that fresh air gets pulled in on the left and right and the A/C can "breathe". (I'll try to grab a pic at a later date.) |
Final result with door in place. |
Range Hood:
The range hood is a recirculating type which doesn’t do much for smoke or cooking odors. If you’re comfortable with drilling a hole in the side of your Shasta, it can be converted to a venting type. While there are several different approaches, I found it easiest to drill a pilot hole all the way through the Shasta’s wall from the inside, centering the bit in the middle of the flat steel section of the hood to the left of the fan housing. Using a holesaw, I came at it from both inside and outside the trailer to get clean edges. I then removed the range hood, blocked the vent slots on the right of the housing, enlarged the slots on the left of the housing and built a sheetmetal air duct to channel the exhaust air out the rear. Once you pull the hood down this all becomes clear. The size of holesaw will depend on the exterior vent you choose. I went with a heavy duty flapper type marked “not for dryer venting”. It’s steel rather than aluminum, and required sanding and painting white to match the siding. I then siliconed around the flange and mounted it with stainless screws. Due be careful, especially on 19-footers. The AC wiring runs up the wall in this area; on a 16’ you can remove the block off panel in the upper cabinet to see the wiring transition. You’ll want to double check where this wiring runs on a 19’ before you pull out the drill.
After you make the committment, mark the hole's center, up/dn and lt/rt in the space left of the vent assembly prior to removing it. Now, remove the assembly to giv eyou some working room and drill a pilot hole all the way through. Then using a hole saw, cut cleanly through from both sides. Warning! You did pull the access panel in the cabinet above and check for wiring running in that area, right? |
After using the holesaw from the exterior. |

Steel exhaust vent, sanded and painted with Rustoleum (many thin coats). |
The hood, now on the workbench. Sheetmetal 'box' formed up from some scrap. Hole opposite the venting side in the factory assembly now plugged. |
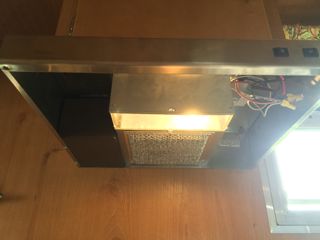
Sheetmetal box installed- directs exhaust out of assembly and through the wall. |
The finished product. Exhaust vent screwed into place (ss fasteners) after applying a sealing bead of silicone to the flange. Looks almost factory. |
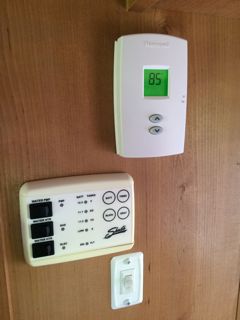
Furnace & T-Stat: A popular upgrade for the Atwood AFSD20121 is to replace the factory thermostat with a digital model. This is an easy and inexpensive swap and you gain a much more readable thermostat (in fact the glass thermometer in our factory one fell out). We installed the Honeywell TH1100DV1000. It’s a simple 2-wire connection and runs on self-contained AA batteries. Before firing up the furnace for the first time you’ll want to remove the grille on the side of the kitchen cabinet (see Microwave pic above) and make sure there’s no construction debris down in the furnace. Also verify that the air discharge flex ducts aren’t crushed or blocked (not entirely unusual).
 |
Cory Heisterkamp 2017