Going Solar
[Note: Pics at bottom of Page]
Having a well-designed DC power system means you’re no longer confined to the cord. Making campsite reservations but all the E-sites are booked? Not a problem. Bad or noisy power at the hookup? Switch to battery. Or perhaps boondocking is in your future. Batteries might get you through a weekend, but unless you know exactly when and where you’ll be able to plug in to top off those batteries, you’re going to need some way to recharge them on the fly.
Alright, where to start?
On one end of the spectrum, RVs and motorhomes usually have large battery banks and onboard generators, converters and inverters tucked “in the basement”, while a small travel trailer like the Shasta does not. It’s not just about cost, but also size, weight and complexity. In fact, the Airflyte reissue didn’t even ship with a battery(!), just a vented battery box and a 12V converter, so you might want to double-check what batt you’ve got in there….and see if it needs water. Some owners carry a portable generator but these have their own limitations as it means carrying extra fuel along, as well as only being able to operate them during certain hours due to noise restrictions. Plus, the best (and quietest) models are fairly pricey. Expect to spend around a grand for a new Honda. Fuel alone would also outstrip the cost of paying extra per night if power were available. With that in mind, and having a little experience with 12V PV, I decided the best solution for us would be a decent battery bank with solar recharging. And it should be do-able for half the cost of a generator.
[It seems that anyone that has an RV and plans to boondock has already created a webpage with their favorite tips and tricks. Don’t get me wrong, there’s some great info out there, and it’s easy to go down a technical rabbit-hole. But what I’ll attempt to do with this page is keep things fairly simple and Shasta-centric.]
A Quick Primer: The reissues are good candidates for a small PV system. The fridge, stove, furnace and water heater are primarily powered off LP (you’ve upgraded to 2 tanks, right?). The onboard electronics are all low current, especially with the factory LED lighting. The only onboard equipment that requires AC is the microwave and the air conditioner. A medium size inverter should be able to handle the intermittent-use microwave (and anything else I want to plug in an outlet), but the A/C is out of the question. Even a small unit would kill a battery bank quickly. If A/C is a must, then a cheapie (read: loud) generator just big enough to power it during the hottest hours might be worth picking up. While running, it could also top off the batts after a string of cloudy days, though running it specifically for that purpose wouldn’t make a lot of sense. The good news is that a basic system can be built cheaply if you’re interested in just powering the onboard 12V stuff, and additional capability added as time/money permit.
Before getting too deep, let’s review some common terms you need to be familiar with.
Battery - FLA: (Flooded-Lead-Acid) This is the traditional deep-cycle battery with submersed plates in electrolyte. These batteries require venting during charging and occasional distilled-water top off. They’re designed for heavy discharging and recharging and will survive up to an 80% discharge though will live a lot longer if only discharged to 50%. Advantages are low-cost, high-capacity and easy availability. This is the type of battery most dealers install. They may resemble a car battery but internally are built for heavy discharge/recharge cycling. Batteries labeled ‘Marine Deep Cycle’ will also work, but are designed for the dual purpose of cranking a boat motor AND running deep-discharge accessories. In most cases, a dedicated deep-cycle is preferable.
Battery - AGM: (Absorbent-Glass-Mat) These are also lead-acid batteries, but the electrolyte is suspended in a glass mat material so can be permanently sealed. That means they can be mounted in almost any orientation and don’t require venting when charging. Despite the name, there is a safety vent that will release hydrogen if overcharged, but be aware, there is no way to replace lost electrolyte if this happens. AGM batts are extremely stable in long term storage and deliver a more consistent voltage over their discharge range, but due to their physical design, typically offer less capacity than FLA. AGM batts have a unique voltage requirement for recharge; the ‘Gel’ setting on your charger is not appropriate for AGM despite the common misconception. And AGM batts should never be ‘equalized’.
Converter: This unit takes shore power (120VAC) and powers the 12VDC accessories in the trailer, as well as recharges the house battery. The Shasta uses a WFCO model mounted under the microwave that also incorporates the trailer’s AC circuit breakers. It provides what’s referred to as 3-stage charging:
1. In Absorption Mode (normal operation) it supplies 13.6V to the battery.
2. If it detects the battery is discharged (13.2V or less which is ~50% of a FLA batt capacity) it will go into Bulk Mode and up the output to 14.4V for up to 4 hours.
3. If no demand is sensed after 48 hours, it will go into Float Mode and trickle charge the batt at 13.2V.
Note that these voltages are tuned for a typical FLA battery and not ideal for AGM; more on that later.
Charge Controller (solar): PV panels generate erratic power depending on sunlit conditions and the number of panels in the system. For example, under ideal conditions the 100w panel I’m looking at will generate 17.8V and provide 5.62A. Two such panels in series would double the voltage; two in parallel would double the current. 12V electronics won’t last long being powered at 17.8V, and batteries begin to boil. It’s the job of the charge controller to take the varying (and/or higher) voltage and reduce it to something usable to power 12V equipment or charge your battery but also to prevent battery discharge when PV power drops below usable voltage. A cheap PWM-type controller effectively ‘chops’ the 17.8V down to something usable depending on your battery voltage. If your battery is discharged, it’ll provide more voltage; less if you’re in a float state. Whatever current is available at the time is ‘passed on’ to the battery or load. More expensive MPPT controllers provide the same function, but turn the excess voltage into additional usable current which is simply lost with a PWM-type. In a basic PV setup, a PWM type should be sufficient.
Inverter: The opposite of a converter. This takes 12VDC and turns it into 120VAC by producing a simulated ‘alternating current’ waveform. The best (and most expensive) inverters produce a pure-sinewave, similar to that from your local power company. Cheaper units produce a ‘modified-sinewave’ which is sufficient for most electrical loads, though some electronics may not play nice with a MSW inverter. The more power you need, the larger the physical unit (and greater the cost). But that also drives cable size and fusing. There’s also a point of diminishing returns where you simply don’t have the battery capacity to take advantage of a high powered inverter. For example, an 800w toaster would draw 6.7 amps when plugged in at home (800w/120v). Since the inverter has to provide that same 800w with only 12V available, it would draw 67 DC amps! (800w/12v). A typical 15A 120V circuit would require 150 amps! (plus properly sized cables $$ and fusing)
PV: Photovoltaic as opposed to a thermal-type solar panel or system. These panels convert sunlight into DC power. When shopping, you’ll find two types: Monocrystalline and Polycrystalline. Mono panels are a mature technology and slightly more efficient than Poly. They’re easily distinguishable by the appearance of multiple square ‘cells’ wired together while Poly has a uniform, solid appearance. But Poly panels are cheaper to produce, and making continued efficiency gains. Either will work for a small-scale project like this. Let your wallet and usable space dictate your choice.
Charging and Discharging
Okay, how big of a system am I planning? In the Electrical section you’ll find a document that includes real-life power consumption for Shasta loads. The heavy-hitter is the furnace blower motor at 4 amps. My general rule of thumb is that if we’re camping where you need heat or A/C, and electricity is available, spring for it. A small electric heater is more than enough to keep us toasty without using LP for the furnace and you can switch your fridge over to AC. And with the undersized air conditioner, running it continuously is practically a must in hot weather. However, I want to make sure we have capacity to go away for a fall weekend and take the chill off overnight even if there’s not a hookup.
A good pair of 6V golf cart batteries wired in series are rated at 255 amp-hours. That is, you could draw 255 amps for one hour, 1 amp for 255 hours, or somewhere in between. In actuality, batteries don’t like providing huge amounts of current over a short period, so actual capacity is reduced in that case. Because of this, many are labeled with a C20 rating to help make an apples-to-apples comparison. That is, current available if the battery was discharged over 20 hours. Deep cycle batts also don’t like to be discharged beyond a certain percentage of available charge. Some will go as low as 20% before permanent damage results (that’s pretty low); others, 50%. When in doubt, consult the manufacturer’s datasheet.
Assuming we can safely discharge to 20%, that leaves 204AH usable. With a 1 amp continuous draw, we could power the fridge electronics for 255 hours, or 10.6 days (while cooling is on LP). With intermittent use of the radio, lights and fantastic fan, we’re probably looking at a 40AH discharge per day (gee that seems like a lot).
In the future, I plan to upgrade to a pair of GC2 sized golf cart batteries, but for the time being, I’m sticking with my Optima bluetop DM-31. The advantage of this batt is that it’s sealed, so relocating it to the front left bench was fairly trivial (no venting required). But being a spiral-cell design, capacity is lacking (75AH). If you have a 16’ Shasta, I highly recommend moving your battery out of the rear bench and getting rid of all the extra wire and voltage drop that results (remember, every millivolt is important here). If you currently have a FLA, you must find a way to vent it as these batteries produce hydrogen gas when charging. There are plenty of aftermarket vent kits and boxes available, and just as many creative solutions.
To charge a FLA batt, you really need 14.4V or greater (measured at the battery terminals!) unless it’s topped off and you’re floating it. It’s a long stretch from the alternator at the front of your tow vehicle all the way to the rear bench. Considering that your alt is adjusting its output based on the state of charge of the tow vehicle’s nearby battery, don’t assume you’ll have enough voltage at your trailer batt to do much more than maintain its charge, especially if any accessories are on in the trailer (like attempting to run the fridge on DC power). This is also a good time to point out that a SLA batt needs a little more juice than FLA, so you might actually be discharging your battery when towing if you’re running an Optima or similar. For that reason, I’ve added a ‘tow charge disconnect’ switch in the Shasta that cuts the 12V line from the tow vehicle. Also handy to prevent killing the tow vehicle battery if you’re parked but still connected while running equipment in the trailer (or say, parked at a truckstop or parking lot overnight). If you’ve added a battery cutoff switch DO NOT simply leave it open while traveling since your emergency trailer brakes rely on the house battery.
AC Loads
Okay, so we’ve covered some battery basics and DC loads. Talked about efficiency improvements to the system. And we have a ballpark DC power consumption in amp-hours. What about AC loads?
In the reissue, there are only two built-in devices that can’t be powered by alternate means. The air conditioner and the microwave oven. The microwave we can run off an inverter, along with the 5 AC receptacles throughout the trailer. Air conditioning is out unless we’re pulling a second trailer full of lead acid batteries.
If you size for a 15 amp AC load (which is what the outlets are currently wired/limited at) you’ll need an 1800 watt inverter. 2kW is a popular size and should work as along as its surge rating is high enough to allow the microwave to start. In general, timing circuits and controls, like the usual microwave keypad, can behave unexpectedly with a MSW inverter. That said, I couldn’t pass up a sale on a 3kw (6kw peak) inverter from Harbor Freight. It’s obviously more power than we’ll need in the Shasta, but with some basic tools it can be removed to serve double-duty for times we’re not camping, and it fits available space in the front bench. Plus the Shasta microwave works fine with it.
Being near the battery is important, because your inverter is going to pull a lot of current, so you’ll want to keep cables short to reduce voltage drop and keep cost down. The second thing to keep in mind is that you’ll want to be able to turn the inverter on remotely as it’ll draw a small amount of power even without a load present. In the Shasta, I added a remote switch wired in parallel with the power switch on the inverter. A 12V red LED lets me know when it’s on so I don’t kill the battery. Even with power off, I measure a quiescent current of 0.008A. I suspect I can live with that, the problem being a 3kw inverter needs cables sized for 250A, and 250A disconnect switches are cumbersome and expensive. For storage between camping when the Shasta’s not plugged in, I just lift one of the 2/0 positive cable from its nearby batt terminal.
How to connect the AC side of the inverter? Technically, you could simply plug the shore power cord into the inverter (with a 20A adapter) and everything that’s AC powered would work. The problem here is that you’d also be powering the converter, which would be attempting to charge the battery, which is the power source for the inverter…and add up to losses (if not converter damage from the MSW). Obviously, there’s a better way.
In the Shasta, there are really only two AC circuits I care about. One powers the 5 receptacles, the other the microwave. By physically removing the microwave, pulling the converter cover, and removing the access vent on the left side of the kitchen base cabinet, you have plenty of room to access the 120VAC Romex circuits and modify as necessary. You have some flexibility here, but I decided to use a 4PDT 20A switch, and switch the neutral and hot of both of those loads (hence 4 pole) from the existing romex. One side of the switch receives 120VAC power from the inverter (paralleled terminals), the other side connects to the output of the breaker pair in the WFCO. This is typically called a changeover switch in the world of generators. There are two reasons I have to use 4 poles and not 3. One is that the switch isn’t 30 amp rated (current draw on both neutrals 15A+15A). The other is that the outlets have a GFCI breaker in the WFCO, so the neutral must be kept separate from the busbar neutral common to the microwave. If a GFCI breaker isn’t important to you, you can always replace it with a standard breaker and use the common neutral for everything.
I had planned on doing this with relays, but ran into a similar problem. Finding ice cube relays (or small contactors) to handle four 15A circuits ended up being expensive and complicated and required multiple parts. Plus relay coils draw current, which we’re trying to avoid.
A pair of neon indicators as well as an AC voltmeter tell me at a glance which power source is available (as well as campground power quality when plugged in). Keep in mind, AC voltage will read lower from an inverter due to the modified shape of the waveform. A ‘True RMS’ meter is needed to accurately measure such a circuit, so don’t be surprised if you only ‘see’ 90-100V with a cheap VOM.
Enough already, let’s talk about Solar Power!
It would be great if solar power generation was a sure thing, but it’s not. There are cable losses, there are panel losses, the charge controller is going to have an internal current consumption, and even if you optimize panel angle throughout the day, there can still be cloudy weather. What this translates to is a need to intentionally over-size the system as far as your wallet and transportability will allow. While some people permanently mount panels on their rig, I wanted something portable I could fold up. Of course you’ll pay a premium for ready-made, so the plan is to take a pair of off the shelf (inexpensive) 100w panels, hinge them, add bumpers, and make my own oversized suitcase. If I’m worried about theft, I can lock them in the tow vehicle, but a steel cable and padlock to the trailer frame works fine, too If a hail storm is coming, I can fold them up. Should I want power away from the trailer, I can take them with. And adjusting for optimum angle is easy. Plus no holes in the roof or cooking ourselves inside the trailer because we had to park it in the sun.
For starters, I was looking at various 100w Renogy panels. These are priced roughly $1/watt on sale and deliver 5.6 amps under optimum conditions. A pair in parallel can deliver up to 11.2A. With system losses, figure 10 amps when it’s sunny. We know there’s at least 10-12 hours of daylight in most places in the US during the summer, but for solar calculations it’s usual to rely on a 4 hour assumption (averages best/worst irradiance at a single location over the course of days). So, 10A x 4 Hours = 40AH back into the batt on average. Some days may be better, others worse, but with a large enough battery capacity, it should all average out. But perhaps this is too optimistic of an average.
Something I haven’t seen mentioned elsewhere is applying the PVWatts tool to spitball potential solar generation at various latitudes. Of course, first you have to know where you’re going. But after plugging in a zip code and system parameters (notice it sizes based on kW, so don’t forget the leading decimal point for small systems) you can actually generate and download a .csv file (“Download Results: Monthly | Hourly”) and play around with DC voltage generated per hour, per day, etc. at different times of the year. Without downloading the file, the data presented will be in meaningless AC kWh.
For example, for central IA, a 200w system with 5% losses, will generate 30.2kWh over the month of June with a fixed tilt of 42 degrees and no shading. Divide by 30 days and that’s 1000w a day. 1000w/12V yields 83.3 amps generated during the day. That’s roughly twice our estimated daily usage. Change the angle of the panels once per day and you might pick up a bit more. This sounds promising.
To match the voltage of the panels to the system, we need a decent charge controller. As touched upon in the Terms section, the panels will be putting out up to 17.8V under ideal conditions (Renogy 100W RNG-100P Poly). The controller must be capable of reducing this voltage to a level adequate to charge an AGM battery without overcharging but configurable for FLA in the future (most Chinese knockoffs are FLA only). A pair of the RNG-100P, wired in parallel, can deliver up to 11.24 amps so at minimum a 20 Amp controller is needed; possibly more to future-proof myself.
Several controllers in the Traveler series from Renogy have caught my eye as they’re a cut-above the $20 Chinese specials, but are still cheaper than a single solar panel.
It appears the three listed below can safely charge AGM batts, handle up to 30 amps, and can take a PV input up to 25VDC (50 for the Adventurer). And, they’re all available under a $100.
The Wanderer is simple by design. It offers 4 charging modes and keeps idle current down (<10mA) by having only 3 LEDs on the front panel. It’ll handle up to 30A, and supports an optional temp sensor for battery temp compensation.
The Voyager is a 20A unit but includes an LCD readout that provides volts, amps and ‘charged capacity’ in amp-hours. If this is a cumulative amps x time, I don’t see a reset button, and the manual is vague. (I have asked Renogy how that works). The big appeal with this unit is that it’s waterproof and that it can charge lithium batteries; neither of those factors really pertain to this install. Idle current is <8mA and temperature compensation of the battery is optional.
Finally, there’s The Adventurer. The appeal is that it can be countersunk into a wall for a flush-mount look. It’s still a PWM charger, but can handle up to 50VDC and 30 amps. Idle current is 13mA. It’ll handle Flooded, Gel and Sealed batts. This one has several other things going for it over the other two.
1. It includes a temp sensor to automatically adjust the charge rate based on the battery’s temperature.
2. Voltage used in determining charge rate is taken right at the battery from a second pair of sensing wires, so you have some freedom in placing the controller without having to worry about voltage drop skewing charging.
3. The LCD readout appears to actually be useful, showing PV voltage, charge current, generated energy in kwh (resettable), batt temp and batt voltage (again, at the terminals).
This model looks ideal, except it claims to equalize sealed batteries on a 28-day schedule. Equalizing a SLA can greatly reduce life if not done correctly. Per Renogy, cutting power to the converter before 28 days elapses prevents this. Ultimately, this is the unit I went with and it fits right next to the WFCO and changeover switch, so is hidden behind the cupboard door most of the time.
Wiring the Adventurer
Installation was pretty straightforward, though no template is provided for flush mounting, and there’s not a lot of flange, so measure and cut carefully. The included remote temp sensor and wire pair (to pick voltage directly off the battery terminals) were both long enough to reach from the WFCO ‘under microwave’ location over to the front bench without modification. For DC output, I simply wired directly in parallel with the WFCO’s 12V output charge circuit as this is already heavier gauge wire that runs directly to the battery and is literally inches away. For the input, I used some scrap PV wire with MC4 connectors (watch polarity) and snaked these over to the outside AC vent (which I previously upgraded to an access door). A 20’ pair of wire connects these to my 200w ‘solar suitcase’ made from a pair of 100w Renogy panels. After install and a quick config on battery type, the unit displays batt temp, voltage, charge current, and cumulative generated power.
The Panels
Building the ‘solar suitcase’: I went with a pair of 100w Renogy panels (shop around, they also sell on ebay). The panels themselves measure 47x21 inches and weigh 16 lbs each so they’re a little cumbersome, but I don’t think I’d go any smaller. I coupled these into a suitcase fashion with stainless hinges, briefcase-style chrome latches and a pair of slick carrying handles from the kitchen department of the local box store. Some rubber corner protectors help with the sharp edged aluminum frames. Future plans include a sliding support that would hinge on the back and eliminate propping the panels up on water jugs/picnic benches. Hey, whatever works. To keep voltage drop down, 10-awg PV wire is used to connect these to the Shasta, and a cable/padlock ensure they don’t walk off when nobody’s around.
Performance
Driveway performance on a sunny day proved excellent (~10A charge), but how did the setup do in the real world? To answer that question, the system was put to the test for a week in northern MN. The first two days of camping were overcast and we generated practically no power. The Optima did fine, but with the furnace cycling at night (4-5A draw) I started to worry. Day 3, plenty of sun, and this is where the portability saved the day as the tall pines and heavy greenery limited panel placement. By moving the panels a couple times throughout the day, I’d estimate we recovered 25% of used capacity. At a more southern latitude, or with less tree cover, I’d expect that number to double. If we hadn’t used the furnace, and relied on all other loads (radio, fridge fans, interior lights) I don’t think we would ever run out of power with this setup. That said, by day 7, with occasional sun throughout the week, and furnace usage every night, I’d estimate we were slightly below 50% remaining batt capacity with our limited Optima. At this point, I have no qualms about using the setup as-is, though more battery capacity in the future is a desire. This might even be as simple as carrying a spare, charged, batt in the back of the tow vehicle. That would also keep weight down if camping on shore power.
In summary:
1. 200w panels and the Adventurer charge controller seem like a good fit for the Shasta.
2. Go for as large a battery bank as your wallet and physical space allow. A single Optima is limiting (though it is ventless).
3. The inverter worked great with the microwave, but the amount of power it pulled out of the batt was alarming for more than 30 second warm-ups (~100 amps at 12VDC).
4. For general-purpose camping, this setup proved adequate (7-days off grid).
5. Can’t beat the cost…just shy of $500 including 3kW inverter.
BOM:
Renogy Adventurer Charge Controller: $50
2x Renogy 100W Poly Panels $205
PV Interconnect Cable & Splitters: $27 3kW
Inverter Harbor Freight #69712 (closeout) $112
Misc hinges/hardware: $15
2/0 Batt Cables: $25
Changeover Switch Parts: $52
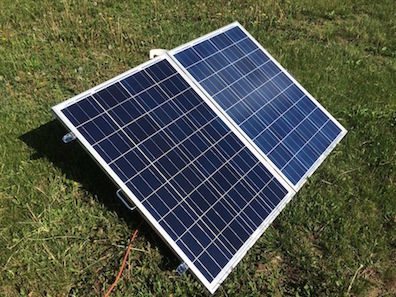
2x 100W Panels - Note handle & latches
|
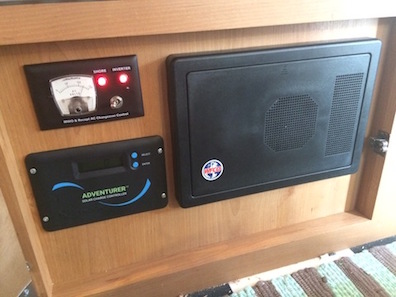
Adventurer Controller and Changeover Controls
|

Master Panel - Shows instantaneous current (draw or charge)
and battery voltage. Button on end activates inverter. |
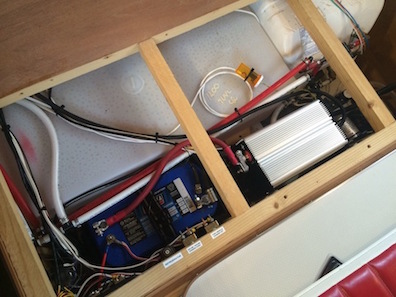
AGM Batt and 3kW Inverter in Front Bench |
|
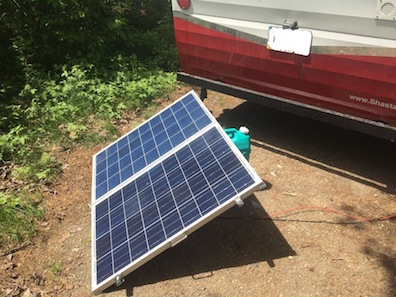
Another panel shot. A 12 ga extension cord (not shown)
allows remote panel placement using PV adapters. |
Return to Home
Cory Heisterkamp 2020